

How To Repair A Rotted Roof Rafter
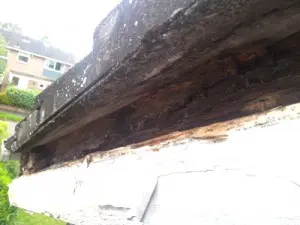
 Roofline Replacement Step 2 – Preparing Rafter Feet
The rafter feet are a key part of your roofline structure. They must be solid so you can fit your replacement roofline components.
In my previous post, Roofline Ripping Out, I described how to remove the visible components of your existing roofline. The next stage is to check and prepare the rafter feet. There are two parts to this stage – 'preparing the rafter feet' and 'splicing'. Both are equally important.
Rafter feet are generally spaced just under a meter apart, along the length of the run. After you've done a few simple checks you may find you need to carry out carpentry work to restore your rafter feet.
Important: Do not attempt to fit your replacement fascias to rafter feet that have any indication of rot. If you do, your roofline is likely to develop problems sooner rather than lasting for many, many years as it should.
Remember, structural wood, such as rafter feet, needs to be replaced if you spot any weaknesses. Do not attempt to tidy up with filler. Filler material is purely cosmetic, it has no strength for supporting any weight.
Rafter Feet Checks

As you check each of the rafter feet look for obvious signs of weakened wood.
Has the wood colour changed because of damp?
Are there any tiny holes? These are telltale signs of woodworm. In fact woodworm can sometimes be more of a problem than wet rot.
If you suspect woodworm or wet rot in your rafter feet you must cut back the affected area completely and splice a new piece alongside.
If you are unlucky enough to have an extreme case, where the rot has spread further than the eaves, then you must find a more solid fixing further up the roof. You may have to go into the attic space. If this is the case then it is most likely that the tile battens (these are the strips of wood that your roofing tiles are held on) are resting on the rotted rafters.
It is a very tricky job to carry out and I urge you to get a competent installer to sort it out for you. If you attempt to do it yourself and remove wood that tile battens rest upon you could collapse sections of your roof and greatly damage the roofing felt. So, my professional advice is, do not attempt to remove wood past the first batten.
OK, having checked for visible signs of problems, you need to be certain the wood is as solid as it looks.
Use a flat headed screwdriver to stab into the grain of the wood of each of the rafter feet. If the wood crumbles or flakes then it needs to be replaced.
Professional Tip: Always carry out checks and repair or replace your rafter feet before you measure for the replacement fascias – if you measure before you do any rafter feet splicing that is needed you may get fitting problems.
Do Your Rafter Feet Actually Need Attention?
All rafter feet have a little rot or discoloration from where the old nails have rusted and left stains and larger holes than the size of the nails that came out. This is normal and they do not need any remedial work.
Professional Tip: If the tests you carried out with the screwdriver did not highlight any rotting wood, then the best way to make doubly sure your rafter foot is strong enough is to test a fixing:
Drive a wood nail in with a hammer and give it a wiggle. A good solid fixing hardly moves whereas a bad one does not hold the 'bite' of the nail.
Rafter Feet – Splicing
If you've established your rafter foot does have some rot you need to prepare it ready to splice a new, strong piece of wood onto it:
Using a sharp wood saw, cut past any rot with a nice clean, angled cut and remove the decayed timber.
Always be careful when removing wood on gable ends as it is very easy to accidentally lose the verge cement. If you have any concerns that this may happen then it is best to leave it and seek professional assistance. Verge cement can drop, along with tiles, giving you a serious roof collapse.
It is also very common for gable ends to have their trusses (sometimes called gable ladders) resting and fixed on purlins. These support the entire roof and prevent sagging.
Purlins are made of wood that is much harder than the wood used for trusses. However, they can rot just as easily and can cause very severe structural problems when they do. A totally rotted purlin is useless and cannot be cut back past the wall.
If your purlin is rotted do not attempt to replace it, seek professional help. Unfortunately a rotted purlin may be an indication that you need a new roof.
Always make sure the new wood you are going to use for splicing is the same thickness as the existing timber – i.e. 3"x2" will need 3"x2", 4"x2" will need 4"x2". I know this sounds trivial and absolutely obvious but I frequently come across small DIY jobs that have used whatever wood was lying about in the shed.
Using these scraps of incorrectly sized timber is false economy – the splice may appear solid when first done but is unlikely to last more than a year or two. I urge you to make a wise investment – buy the correct size wood.
When splicing the new wood onto the existing rafter feet, you want to get a good bite into the two pieces of wood, so use high quality wood screws of around 70mm to 90mm – these give you a firm fixing.
Use a power drill to pilot hole each fixing with a slightly slimmer drill bit than the thread of the screw – this helps to avoid splitting the wood whilst providing a good bite.
Make at least two fixings so there is no movement afterwards. If you use only one screw you create a 'see-saw' effect where the wood moves under pressure.
Splicing alongside rafter feet is generally done on a fascia soffit gutter run. Replacing the rotten area only is too short for a firm hold. You are basically trying to mimic the rafter feet either side of the affected timber. It is not essential for it to be exactly uniform with the rest at this stage.

Splicing in a gable ladder is slightly harder. Once again, an angled cut past the rot on the wood will help you to get a good fix but it may take several trips up the ladder to achieve a neat and tidy measurement.
Getting the angles right is key here so it is very helpful if the original rotted wood comes off in one piece so you can use it as a template.
Once the new wood is cut and tested for a tight fit, drive in the screws after piloting and make sure that it is firm and stays in position when you try to wiggle it.
This is the second of the nine steps our professional fitters carry out when fitting a replacement roofline. As you can see, you must take great care to avoid damaging your roof unintentionally.
This is why many householders decide to get it done by professionals.
My fitters at Anglia Roofline are specialists at installing replacement rooflines – this is the only type of building work we carry out.
Related Posts:
Roofline Ripping Out
Replacing Your Roofline
Roofline Repair Tools
Roofline Nest
How To Repair A Rotted Roof Rafter
Source: https://www.angliaroofline.co.uk/rafter-feet/
Posted by: mannfoomescree.blogspot.com
0 Response to "How To Repair A Rotted Roof Rafter"
Post a Comment